What is Ansible? What can Ansible do?
What Is Ansible
Ansible is a configuration management and IT automation tool. Simply put, it’s a tool that automates scripts.
Imagine having to manually deploy a dozen services across dozens of machines, with the occasional failed upgrade and rollback thrown in — that would be a nightmare. This is where automation tools like Puppet, Chef, and Ansible become an ops person’s lifeline.
Why Ansible
- Agentless — just set up SSH keys and you’re ready to go.
- Large user base in China — most DevOps job listings mention Ansible.
- Extensive community playbooks — you can find pre-built playbooks for common software installations online.
- Simple — not many concepts to learn, easy to pick up.
Ansible Architecture
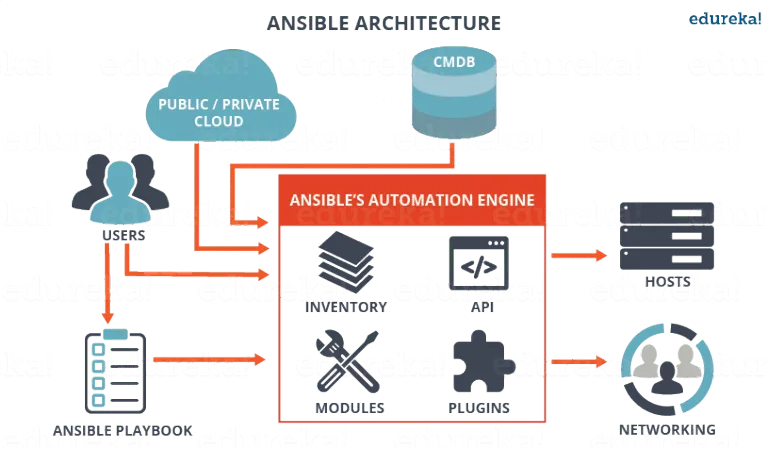
This is an Ansible architecture diagram I found online. From the diagram, you can see that Ansible’s core components are Inventory, Modules, and Plugins. Users invoke these components through ansible-playbook or other APIs to run automation tasks on target hosts.
Installing Ansible
On Linux, just use pip: pip install ansible.
Ansible has known issues on Windows and macOS — best to avoid those platforms.
After installation, verify with ansible --version.
Using Ansible
For everyday use, you only need to understand these core concepts:
- host inventory
- ansible CLI command
- module
- playbook
To quote the Ansible docs:
If Ansible modules are the tools in your workshop, playbooks are your instruction manuals, and your inventory of hosts are your raw material.
Host Inventory
Ansible typically connects to many hosts, and the inventory is the file that declares those hosts.
It can be in INI format:
mail.example.com

[webservers]
foo.example.com
bar.example.com

[dbservers]
one.example.com
two.example.com
three.example.com
Or YAML format:
all:
  hosts:
    mail.example.com:
  children:
    webservers:
      hosts:
        foo.example.com:
        bar.example.com:
    dbservers:
      hosts:
        one.example.com:
        two.example.com:
        three.example.com:
Ansible configs generally support both formats.
Notice the example above also supports grouping — using a name to represent a group of hosts. Beyond declaring IPs/hostnames, you can also specify other parameters:
jumper ansible_port=5555 ansible_user=root
Ansible CLI Command && Module
You’ve probably seen people highlight that Ansible is “agentless” — so how does that actually work?
It’s really simple: SSH. As long as you add the control host’s key to the target host’s authorized_keys, Ansible can control it over SSH.
For testing, let’s add the local host to the inventory:
localhostSave this as hosts (Ansible’s default inventory filename is hosts), then add the host’s public key to the local authorized_keys. Now run:
ansible -i hosts all -m ping
If everything works, you’ll see output like this, indicating a successful connection to all hosts in the inventory:
localhost | SUCCESS => {
    "changed": false,
    "ping": "pong"
}
Here’s what the command ansible -i hosts all -m ping means:
ansibleis the CLI tool, used for testing or running simple tasks on hosts. For more complex or numerous tasks, you’ll needansible-playbook, which I’ll cover below.-i hostsspecifies which inventory file to use. The default is~/.ansible/hosts. Besides using the default or specifying with-i, you can also set an environment variable to change the file path — see the official docs for details.allmeans select all hosts. If you set up groups in the inventory, likewebserversin the example above, changing this towebserverswould only connect to that group of hosts.-m pingmeans use the ping module. Modules are tools Ansible provides to simplify operations. Common ones includeshell(run shell commands),copy(copy files to target hosts),file(create files, modify file permissions), and so on. The most commonly used is thepingmodule, which tests whether the hosts in the inventory are reachable.
Playbook
“Playbook” literally means a script for a play. In Ansible, a playbook combines a series of operations to achieve reusability. One reason Ansible is so popular is how convenient playbooks are — the official team and many developers have written reusable playbooks for installing common software. Users just need to download a playbook and run it.
Playbooks use YAML syntax. A typical playbook directory structure looks like this:
├── defaults
│   └── main.yml
├── files
├── handlers
│   └── main.yml
├── tasks
│   └── main.yml
├── templates
│   ├── example.conf.j2
└── vars
    └── main.yml
Let’s start with tasks/main.yml.
tasks
main.yml is usually the entry point — you can do all the work here, or import other task files.
Here’s an example playbook for installing a Django application, covering directory initialization, code copying, and starting the app:
---
# install django
- name: install django
  shell: pip install "django{{ django_version }}"

# init directory
- name: init directory
  file:
    path: "{{ project_path }}"
    state: directory
  notify:
    - restart example

# copy code to target directory
- name: copy code to target directory
  copy:
    src: mysite
    dest: "{{ root_path }}"

# generate config file
- name: template supervisor file
  template:
    src: example.j2
    dest: "{{ supervisor_app_path }}"
  notify:
    # reload supervisor config
    - reread example
    # restart the application
    - restart example
As you can see, each step is a module. In a playbook, you decompose your manual operations into small tasks and achieve your goals through modules.
vars and defaults
Both folders store variables:
---
# vars/main.yml
project_user: root
root_path: /tmp
project_path: /tmp/mysite
log_path: /tmp/mysite/log
program_name: example
supervisor_app_path: /etc/supervisor/conf.d/example.conf
---
# default/main.yml
django_version: "<2"
Variables declared here can be referenced elsewhere using {{ vars }} syntax. The difference between vars and defaults is exactly what the names suggest: variables in defaults typically stay the same once set, while those in vars often change depending on requirements and environment.
templates
Templates are commonly used to generate configuration files for various software. They use Jinja2 syntax for file generation — the {{ }} variable interpolation syntax comes from Jinja2. By combining them with variables from vars and defaults, and using the template module in tasks, you can quickly generate new config files. In our example, this is used to generate the supervisor configuration:
[program:{{ program_name }}]
command=python manage.py runserver
autostart=true ; supervisord starts this automatically on daemon startup
autorestart=true ; supervisord restarts this automatically on daemon restart
redirect_stderr=true ; redirect stderr to stdout
user={{ project_user }}
directory={{ project_path }} ; cd to the app directory
stdout_logfile={{ log_path }}
files
Besides config files, there are usually static files (like verification keys, environment variable files) that need to be copied to target hosts. The files directory works with the copy module to send these files:
- name: copy code to target directory
  copy:
    src: mysite
    dest: "{{ root_path }}"
Of course, the more common way to download code is through git — Ansible provides a git module for that.
handlers
Handlers typically manage service start/stop operations:
---
- name: reread example
  supervisorctl:
    name: example
    state: present

- name: start example
  supervisorctl:
    name: example
    state: started

- name: restart example
  supervisorctl:
    name: example
    state: restarted

- name: delete example
  supervisorctl:
    name: example
    state: present
So how are handlers called? Notice the notify keyword in the tasks above.
Let’s pause here to introduce a few concepts about how Ansible handles tasks. When Ansible runs each small task (corresponding to one module in tasks/main.yml), it outputs the task’s completion status.
There are two statuses: success and failed. Normally, if a task results in failed, the entire playbook halts. success also splits into two: changed=true and changed=false. changed=true means the task’s execution differed from its previous run — for example, the file copied by the copy module is different, or the content generated by templates changed, and so on.
Back to notify — its content is a list of handlers. During playbook execution, notify watches for the changed status. Only when a task actually changes something will the handlers in notify execute. This property makes it a natural fit for service start/stop operations.
In the example above, the service only restarts when the code changes or the supervisor config changes. If you used a plain module in tasks for service start/stop, it would restart the service on every run — even when nothing has changed — which is often inappropriate.
I’ve walked through all the common playbook directory contents, but did you notice the first task in the example tasks/main.yml? It uses the shell module to install Django: pip install django. Have you thought about the fact that most machines don’t have pip pre-installed? Let alone supervisor, which we use to run Django?
Do I need to add pip and supervisor installation steps here? Of course not. As I mentioned when introducing playbooks, you can easily find playbooks for installing them online. But how do you combine them with this Django deployment playbook?
roles
This is where roles come in. Ansible introduces roles to differentiate between playbooks — similar to different actors reading different scripts, each with their own role to play.
Here’s the directory structure after adding roles:
roles
├── example
│   ├── defaults
│   ├── files
│   ├── handlers
│   ├── hosts
│   ├── meta
│   ├── tasks
│   ├── templates
│   ├── tests
│   └── vars
├── geerlingguy.pip
└── geerlingguy.supervisor
Now we clearly need an entry point file to call both playbooks:
---
# django.yml
- hosts: all
  roles:
    - geerlingguy.supervisor
    - geerlingguy.pip
    - django
Now you can call ansible-playbook to deploy your Django app:
ansible-playbook -i hosts django.yml
Summary
Real-world ops tasks don’t always match the steps in the example above, so before writing a playbook, you generally need to break the task down first. Taking the Django deployment example again, the task can be decomposed into:
- Install dependencies (pip, supervisor, Django)
- Initialize machine directories
- Copy code to target host
- Start/restart the service
The dependency installation part can be delegated to other playbooks. Service start/stop is handled by handlers. Directory paths, service parameters, Django version, etc., go into variables in defaults and vars. Code can be placed in files for easy copying. The full task flow is written in tasks.
Once you’ve done the decomposition, writing the playbook is just a matter of time.