I’ve been reading Linux Kernel Development recently, and the book starts off by having you set up a Linux 2.6 environment.
Getting the environment right took me several days of wrestling. So here’s a walkthrough of the setup process and the pitfalls you might run into.
Base Environment
OS (virtual machine): ubuntu-14.04 64-bit (ubuntu-14.04.6-server-amd64) Linux kernel: 2.6.26 qemu: 2.0.0 busybox: 1.20.1 gcc: 4.8.4
I used a VM to run Ubuntu for compilation, then built a root filesystem with BusyBox, and finally used QEMU as an emulator to boot the compiled Linux kernel. I strongly recommend using the exact same environment for compilation — you’ll otherwise run into a lot of unnecessary trouble. When you’re just getting started, it’s not worth wasting time on compatibility issues.
The kernel compiled here is 32-bit because this version of QEMU and GDB has bugs when debugging 64-bit systems. You could also just use a 32-bit Ubuntu directly, which would simplify compilation, but VSCode Remote doesn’t support connecting to 32-bit systems. You might want to read up on what a root filesystem is.
The steps below are primarily for macOS, but the process is largely the same on Windows/Linux.
I’ve completed the setup on both Windows and macOS.
System Environment Setup
1. Create a VM with Vagrant
Vagrant is a VM management tool that simplifies creating and destroying virtual machines. Under the hood it still uses VirtualBox. If you don’t want to use Vagrant, you can use VirtualBox/VMware directly.
$ echo """Vagrant.configure("2") do |config|
  config.vm.box = "ubuntu/trusty64"
  config.vm.box_check_update = false
  config.vm.network "private_network", ip: "192.168.33.100"
  config.vm.provider "virtualbox" do |vb|
    vb.cpus = 2
    vb.memory = "1024"
  end
end
""" > Vagrantfile

$ vagrant up
$ vagrant ssh
$ sudo su
All subsequent operations assume root privileges.
2. Switch to a Chinese mirror (Aliyun)
$ cd /etc/apt
$ cp sources.list sources.backup
$ echo """
deb http://mirrors.aliyun.com/ubuntu/ trusty main restricted universe multiverse
deb http://mirrors.aliyun.com/ubuntu/ trusty-security main restricted universe multiverse
deb http://mirrors.aliyun.com/ubuntu/ trusty-updates main restricted universe multiverse
deb http://mirrors.aliyun.com/ubuntu/ trusty-proposed main restricted universe multiverse
deb http://mirrors.aliyun.com/ubuntu/ trusty-backports main restricted universe multiverse
deb-src http://mirrors.aliyun.com/ubuntu/ trusty main restricted universe multiverse
deb-src http://mirrors.aliyun.com/ubuntu/ trusty-security main restricted universe multiverse
deb-src http://mirrors.aliyun.com/ubuntu/ trusty-updates main restricted universe multiverse
deb-src http://mirrors.aliyun.com/ubuntu/ trusty-proposed main restricted universe multiverse
deb-src http://mirrors.aliyun.com/ubuntu/ trusty-backports main restricted universe multiverse
""" > sources.list
$ apt-get update
3. Install the build environment
$ apt-get install -y libncurses5-dev build-essential
$ apt-get install -y lib32readline-gplv2-dev # for compiling 32-bit
4. Install the debugging environment
$ apt-get install -y qemu-system-x86 gdb5. Download Linux and BusyBox
$ mkdir linux
$ cd linux
$ wget https://www.busybox.net/downloads/busybox-1.20.1.tar.bz2
$ wget https://mirrors.edge.kernel.org/pub/linux/kernel/v2.6/linux-2.6.26.tar.bz2
$ tar -xf busybox-1.20.1.tar.bz2
$ tar -xf linux-2.6.26.tar.bz2
Linux Compilation
1. Apply the patch
Create a file called fix.patch inside the linux-2.6.26 directory and paste the following:
diff -Naur linux-2.6.26/arch/x86/lib/copy_user_64.S linux-2.6.26-2/arch/x86/lib/copy_user_64.S
--- linux-2.6.26/arch/x86/lib/copy_user_64.S	2008-07-13 21:51:29.000000000 +0000
+++ linux-2.6.26-2/arch/x86/lib/copy_user_64.S	2021-04-22 07:04:49.894796787 +0000
@@ -341,7 +341,7 @@
 11:	pop %rax
 7:	ret
 	CFI_ENDPROC
-END(copy_user_generic_c)
+END(copy_user_generic_string)

 	.section __ex_table,"a"
 	.quad 1b,3b
diff -Naur linux-2.6.26/arch/x86/vdso/Makefile linux-2.6.26-2/arch/x86/vdso/Makefile
--- linux-2.6.26/arch/x86/vdso/Makefile	2008-07-13 21:51:29.000000000 +0000
+++ linux-2.6.26-2/arch/x86/vdso/Makefile	2021-04-22 07:05:29.090798510 +0000
@@ -25,7 +25,7 @@

 export CPPFLAGS_vdso.lds += -P -C

-VDSO_LDFLAGS_vdso.lds = -m elf_x86_64 -Wl,-soname=linux-vdso.so.1 \
+VDSO_LDFLAGS_vdso.lds = -m64 -Wl,-soname=linux-vdso.so.1 \
 		     	-Wl,-z,max-page-size=4096 -Wl,-z,common-page-size=4096

 $(obj)/vdso.o: $(src)/vdso.S $(obj)/vdso.so
@@ -69,7 +69,7 @@
 vdso32-images			= $(vdso32.so-y:%=vdso32-%.so)

 CPPFLAGS_vdso32.lds = $(CPPFLAGS_vdso.lds)
-VDSO_LDFLAGS_vdso32.lds = -m elf_i386 -Wl,-soname=linux-gate.so.1
+VDSO_LDFLAGS_vdso32.lds = -m32 -Wl,-soname=linux-gate.so.1

 # This makes sure the $(obj) subdirectory exists even though vdso32/
 # is not a kbuild sub-make subdirectory.
diff -Naur linux-2.6.26/kernel/mutex.c linux-2.6.26-2/kernel/mutex.c
--- linux-2.6.26/kernel/mutex.c	2008-07-13 21:51:29.000000000 +0000
+++ linux-2.6.26-2/kernel/mutex.c	2021-04-22 07:06:51.646802139 +0000
@@ -58,7 +58,7 @@
  * We also put the fastpath first in the kernel image, to make sure the
  * branch is predicted by the CPU as default-untaken.
  */
-static void noinline __sched
+static __used void noinline __sched
 __mutex_lock_slowpath(atomic_t *lock_count);

 /***
@@ -95,7 +95,7 @@
 EXPORT_SYMBOL(mutex_lock);
 #endif

-static noinline void __sched __mutex_unlock_slowpath(atomic_t *lock_count);
+static __used noinline void __sched __mutex_unlock_slowpath(atomic_t *lock_count);

 /***
  * mutex_unlock - release the mutex
@@ -270,7 +270,7 @@
 /*
  * Release the lock, slowpath:
  */
-static noinline void
+static __used noinline void
 __mutex_unlock_slowpath(atomic_t *lock_count)
 {
 	__mutex_unlock_common_slowpath(lock_count, 1);
@@ -315,7 +315,7 @@
 }
 EXPORT_SYMBOL(mutex_lock_killable);

-static noinline void __sched
+static __used noinline void __sched
 __mutex_lock_slowpath(atomic_t *lock_count)
 {
 	struct mutex *lock = container_of(lock_count, struct mutex, count);
diff -Naur linux-2.6.26/Makefile linux-2.6.26-2/Makefile
--- linux-2.6.26/Makefile	2008-07-13 21:51:29.000000000 +0000
+++ linux-2.6.26-2/Makefile	2021-04-22 07:03:43.150793853 +0000
@@ -214,8 +214,8 @@

 HOSTCC       = gcc
 HOSTCXX      = g++
-HOSTCFLAGS   = -Wall -Wstrict-prototypes -O2 -fomit-frame-pointer
-HOSTCXXFLAGS = -O2
+HOSTCFLAGS   = -Wall -Wstrict-prototypes -O1 -fomit-frame-pointer
+HOSTCXXFLAGS = -O1

 # Decide whether to build built-in, modular, or both.
 # Normally, just do built-in.
@@ -502,9 +502,9 @@
 all: vmlinux

 ifdef CONFIG_CC_OPTIMIZE_FOR_SIZE
-KBUILD_CFLAGS	+= -Os
+KBUILD_CFLAGS	+= -O1
 else
-KBUILD_CFLAGS	+= -O2
+KBUILD_CFLAGS	+= -O1
 endif

 ifneq (CONFIG_FRAME_WARN,0)
$ patch -p1 < fix.patchIf the patch fails, it might be because the tabs in
fix.patchgot converted to spaces. In that case, manually apply the changes to the source files as shown above.
2. Set build configuration
$ make ARCH=i386 defconfig
$ make ARCH=i386 menuconfig
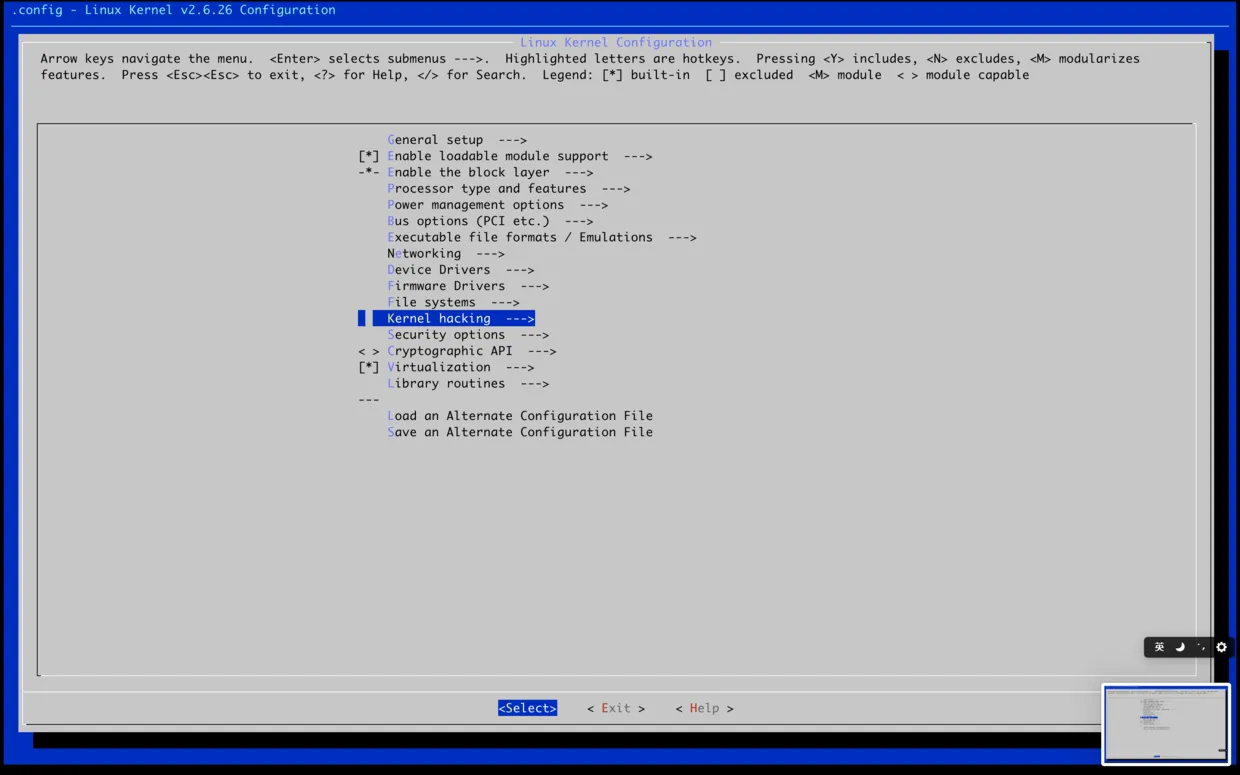
If you get: Your display is too small to run Menuconfig! It must be at least 19 lines by 80 columns. Your terminal window is too small. Switch to full screen and reconfigure.
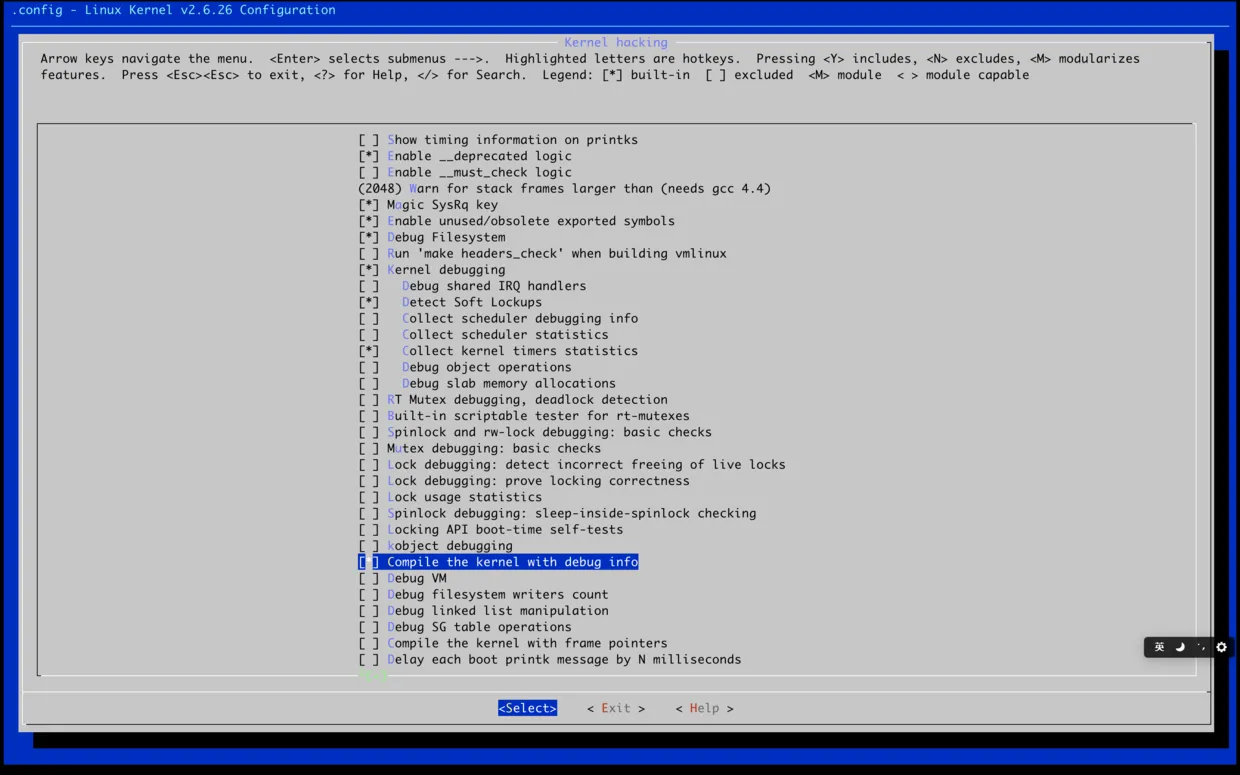
Enable debug info options:
Use arrow keys to navigate, Tab to switch between options below
3. Start compilation
$ make ARCH=i386 -j2
-jNenables parallel compilation — the number is typically CPU cores × 2.
On success, you’ll see:
Root device is (252, 0)
Setup is 12288 bytes (padded to 12288 bytes).
System is 2844 kB
CRC 31a57b1f
Kernel: arch/x86/boot/bzImage is ready  (#1)
Compilation time depends on your hardware — typically a few to a dozen minutes. I’m using a 2018 MBP with a 2.2 GHz 6-core i7, VM configured with 4 cores. Compilation took 5m10s. If compilation feels too slow, here are a few ways to speed it up:
- Increase the VM’s core count and bump up the
-jnumber.- Use a tmpfs filesystem to place source code directly in memory.
- Use ccache to cache each compilation result.
Creating the Root Filesystem
1. Create the image
$ cd ..
$ dd if=/dev/zero of=initrd.img count=1024 bs=4096
$ mkfs.ext2 initrd.img
$ mkdir rootfs
$ mount -o loop initrd.img rootfs/
2. Create character devices
$ mkdir rootfs/dev
$ mknod rootfs/dev/console c 5 1
$ mknod rootfs/dev/ram b 1 0
3. Apply BusyBox patch
$ cd busybox-1.20.1
$ echo """diff -Naur busybox-1.20.1/include/libbb.h busybox-1.20.1-2/include/libbb.h
--- busybox-1.20.1/include/libbb.h	2012-05-28 00:46:41.000000000 +0000
+++ busybox-1.20.1-2/include/libbb.h	2021-04-21 07:55:27.526183582 +0000
@@ -12,6 +12,8 @@

 #include "platform.h"

+
+#include <sys/resource.h>
 #include <ctype.h>
 #include <dirent.h>
 #include <errno.h>
""" > fix.patch
$ patch -p1 < fix.patch
4. Modify the Makefile
In vi, type 292G to jump to line 292, then append -m32 at the end:
$ vi Makefile
CC              = $(CROSS_COMPILE)gcc -m32
5. Set build options
$ make defconfig
$ make menuconfig
Select static linking:


Disable the Shell → Job Control option:


6. Compile and install BusyBox
$ make -j2
$ make CONFIG_PREFIX=../rootfs install
After installation, you should see this in the rootfs directory:
$ cd ..
$ ls -lah rootfs/
total 20
drwxr-xr-x 5 root root 4096 Apr 21 08:05 ./
drwxr-xr-x 7 root root 4096 Apr 21 08:05 ../
drwxr-xr-x 2 root root 4096 Apr 21 08:05 bin/
lrwxrwxrwx 1 root root   11 Apr 21 08:05 linuxrc -> bin/busybox*
drwxr-xr-x 2 root root 4096 Apr 21 08:05 sbin/
drwxr-xr-x 4 root root 4096 Apr 21 08:05 usr/
7. Unmount rootfs
$ umount rootfsBooting the System
$ qemu-system-x86_64 \
-nographic \
-kernel ./linux-2.6.26/arch/x86/boot/bzImage \
-initrd ./initrd.img \
-append "root=/dev/ram init=/bin/sh console=ttyS0"
Use Ctrl+A then X to exit QEMU.
input: ImExPS/2 Generic Explorer Mouse as /class/input/input2
RAMDISK: ext2 filesystem found at block 0
RAMDISK: Loading 4096KiB [1 disk] into ram disk... done.
VFS: Mounted root (ext2 filesystem) readonly.
Freeing unused kernel memory: 448k freed
/ #
Troubleshooting
VFS: Mounted root (ext2 filesystem) readonly.
Freeing unused kernel memory: 448k freed
Warning: unable to open an initial console.
Failed to execute /bin/ash.  Attempting defaults...
Kernel panic - not syncing: No init found.  Try passing init= option to kernel.
If you see this error, the root filesystem wasn’t created correctly. Go through the steps above again.
VFS: Mounted root (ext2 filesystem) readonly.
Freeing unused kernel memory: 448k freed
If it only shows the VFS message and hangs, you didn’t enable ext2 support when compiling the Linux kernel. Go back to make menuconfig and enable that option.
/bin/ash: can't access tty; job control turned offIf you see this job control warning, go back to BusyBox compilation and disable that option.
GDB Debugging
1. Start QEMU with debug options
$ qemu-system-x86_64 \
-nographic \
-kernel ./linux-2.6.26/arch/x86/boot/bzImage \
-initrd ./initrd.img \
-append "root=/dev/ram init=/bin/ash console=ttyS0" -s -S
2. Start GDB
In another terminal:
$ cd linux
$ gdb --dir=./linux-2.6.26
(gdb) file linux-2.6.26/vmlinux
(gdb) target remote :1234
(gdb) hb start_kernel
(gdb) c
gdb -tuienables a TUI mode that shows source code in real time. You must usehb(hardware breakpoint) — this is due to a GDB bug: gdbserver inside qemu does not stop on breakpoints
If you’re tired of typing
fileandtargetevery time, create a GDB init file:$ echo """ file linux-2.6.26/vmlinux target remote :1234 """ > /root/.gdbinit $ echo """ set auto-load safe-path / """ > .gdbinit
VSCode
If you’re browsing the source in VSCode, check out this article: Setting up a kernel driver development environment in VSCode on Linux
References
Building a Linux 2.6 kernel debugging environment for studying ULK3
elf_i386 or elf_x86_64: No such file or directory — solution
Kernel 2.6.22.6 compilation error: undefined reference to __mutex_unlock_slowpath